| Our Process
Our 10-Step Process
Here’s how we deliver a smooth, durable finish that makes your cabinets look brand new.
At Pure Cabinet Painting, great results start with a proven process. Every cabinet project follows a detailed, step-by-step system built around proper prep, clean application, and long-lasting durability.
Step 1 | Remove & label doors and drawers
Every cabinet painting project starts with careful disassembly. We remove all cabinet doors, drawer fronts, and hardware so each piece can be properly prepared and refinished.
As everything is removed, every door and drawer is carefully labeled and organized to ensure everything goes back exactly where it belongs once the project is complete.
Step 2 | Protect & mask the kitchen
Before any prep or spraying begins, we carefully protect the surrounding kitchen and workspace. Countertops, floors, appliances, walls, and nearby surfaces are masked off to keep your home clean and protected throughout the project.
Cabinet painting requires a controlled environment, and proper masking helps us achieve cleaner, more professional results.
Step 3 | Clean & degrease cabinet surfaces
Kitchen cabinets naturally collect grease, oils, residue, and buildup over time. Before sanding or priming begins, every surface is thoroughly cleaned and degreased to remove anything that could interfere with adhesion.
A durable finish starts with proper preparation, and this step plays a major role in ensuring the coatings bond properly and last long term.
Step 4 | Sand & prep for adhesion
Once the cabinets are cleaned, we sand and prep all surfaces to create the proper profile for primer and topcoats to bond correctly.
Proper prep work is what separates a rushed cabinet paint job from a refined, professional finish. Every surface is carefully prepared to create a smooth, durable final result.
Step 5 | Fill old handle holes (if needed)
If you’re changing your cabinet hardware or moving to a different handle layout, old holes may need to be filled before refinishing begins.
We carefully fill, sand, and level these areas so the finished doors and drawers look clean, seamless, and professionally updated.
Step 6 | Apply high-adhesion cabinet primer
After the cabinets are cleaned and prepped, we apply a professional high-adhesion primer designed specifically for cabinetry.
Using the right primer helps create a strong foundation for the finish while improving durability, adhesion, and long-term performance in high-use kitchen environments.
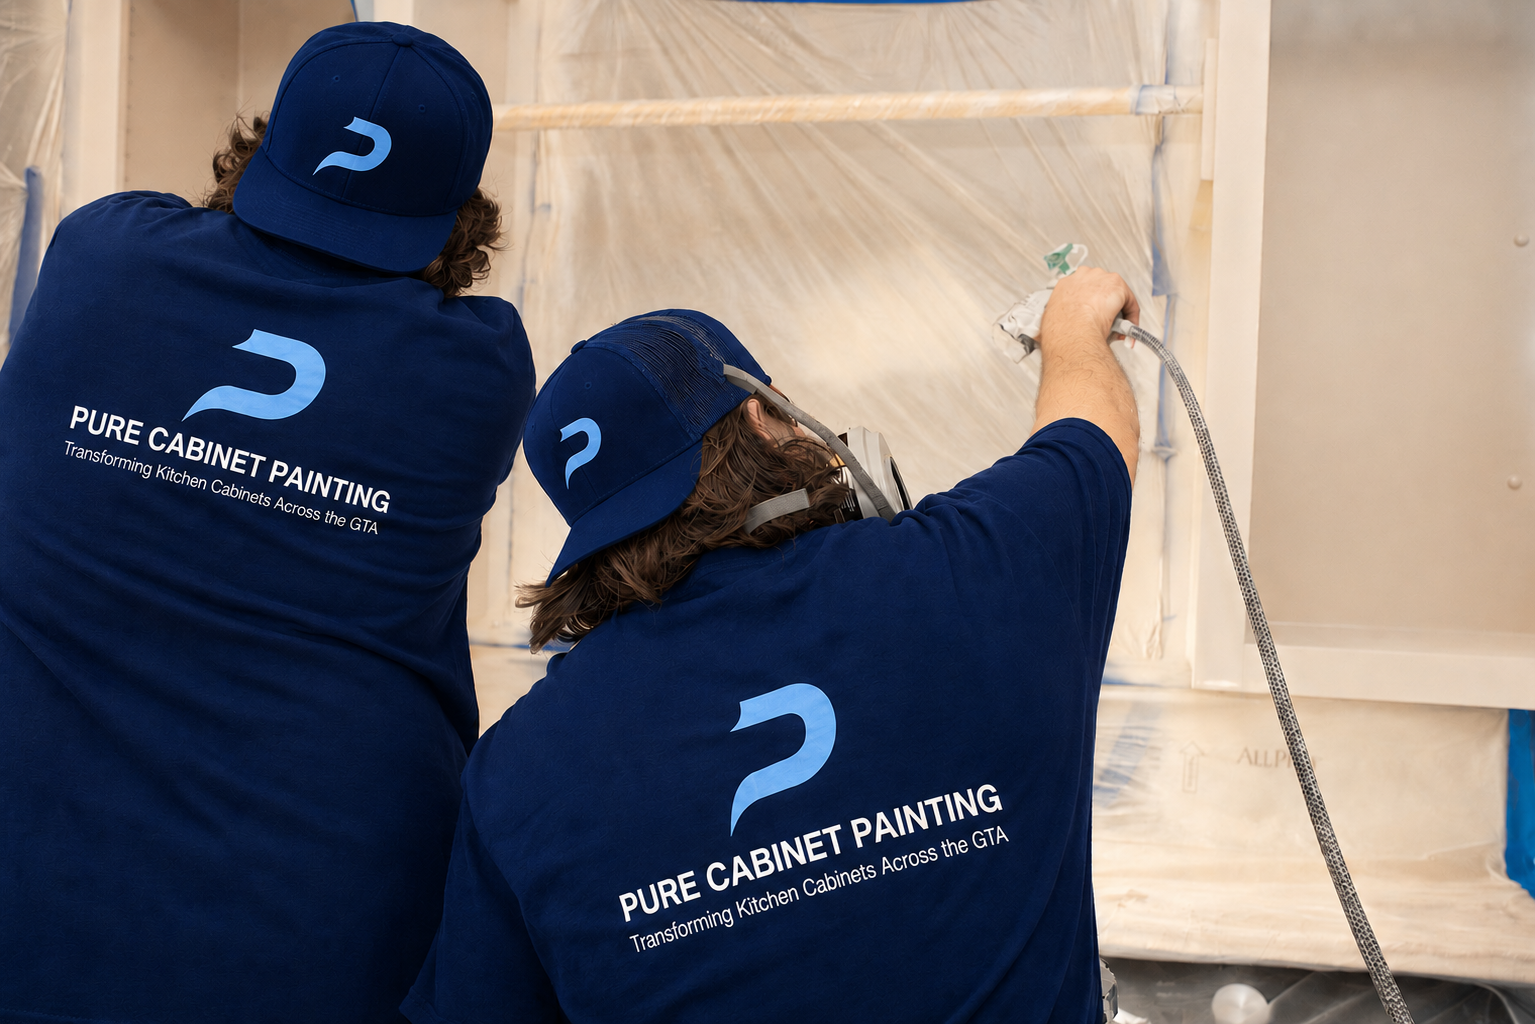
Step 7 | Professionally spray doors & drawers in our shop
Cabinet doors and drawer fronts are professionally sprayed in a controlled shop environment using high-end cabinet coatings and professional spray equipment.
This controlled process helps us achieve a smoother, cleaner, factory-style finish with consistent coverage and long-term durability.
Step 8 | Finish cabinet boxes on-site
While the doors and drawers are being refinished, cabinet frames and boxes are professionally finished on-site with the same level of care and attention to detail.
Our goal is to create a seamless, consistent finish throughout the entire kitchen so everything looks cohesive once reassembled.
Step 9 | Install new hardware (optional)
If your project includes new knobs, pulls, or handles, we carefully measure and install everything with clean alignment and consistent spacing.
New hardware can make a major difference in the overall look of a kitchen and helps complete the transformation.
Step 10 | Reinstall doors & drawers + final walkthrough
Once the finishing process is complete, all doors, drawers, and hardware are carefully reinstalled and adjusted to ensure everything lines up and functions properly.
We finish every project with a final walkthrough to inspect the details, answer any questions, and make sure the kitchen is left clean, complete, and ready to enjoy.
What To Expect When Working With Us
Working with Pure Cabinet Painting is simple, organized, and built around clear communication. From the first estimate to the final walkthrough, we make sure you know what’s happening, why it matters, and what to expect at every stage.
During the Estimate
We’ll walk through your kitchen, take a close look at the condition of your cabinets, and get a clear understanding of the look you want to achieve. We’ll discuss your goals, color options, hardware changes, timeline, and any details that may affect the project.
You’ll receive honest guidance on the scope of work, what’s included, and what the investment looks like. No pressure, no vague answers, and no guessing. Just a clear plan so you can make the right decision for your home.
When Booking Your Project
Once you choose your start date, we’ll lock it in and walk you through how to prepare before we arrive. You’ll know what needs to be cleared, how the space will be protected, and what the general timeline looks like.
Our goal is to make the process feel easy before the work even begins. You’ll know when we’re arriving, what stages come next, and how the project will move from prep to finish.
During the Job
We treat your home with care and keep the workspace clean, protected, and organized. Cabinet doors and drawers are removed, properly labeled, and finished through a detailed refinishing process, while the surrounding kitchen area is masked and protected.
Every step is handled with patience and precision, from cleaning and sanding to priming and applying the final finish. We use a cabinet-specific system designed to create a smooth, durable result that looks clean, consistent, and built to last.
After the Job
Before we wrap up, we reinstall the doors, drawers, and hardware, adjust everything for proper alignment, and clean the workspace. Then we walk through the finished project with you to make sure the details meet our standards and yours.
We’ll also go over simple care guidelines so you know how to look after your newly refinished cabinets. The job is not complete until your kitchen looks finished, your space is cleaned up, and you feel confident in the result.

-
![]()
Zeynep
★★★★★
We’re so happy we went with Pure Cabinet Painting. Their work was clean, detailed, and our cabinets came out looking like new. I highly recommend them!
-
![Modern house with wooden exterior and stone steps leading to a patio, set against a backdrop of green hills and snow-capped mountains.]()
Leen J.
★★★★★
I had a great experience with them. They were professional, honest, and very easy to work with. Anytime I had questions, they were patient and helpful. Overall, a reliable company that truly cares about their customers. Definitely would recommend working with them.
-
![Scenic view of a lake surrounded by mountains and rolling hills under cloudy sky.]()
Nilay
★★★★★
The job turned out great and honestly exceeded my expectations. We were originally planning to renovate the whole kitchen, but this saved us a lot of money. Repainting our cabinets made them look brand new and completely refreshed the space.
-
![]()
Claudia
★★★★★
I am very pleased with their work. professional, fast and they used very high quality paint. My kitchen cabinets look beautiful 👍 Great work.
-
![]()
Mirna O.
★★★★★
They did an amazing and beautiful job finishing up our kitchen cabinets, I’m so happy with the results. My kitchen looks like new and so professionally done. I was impressed with their professionalism, the team was friendly and ethical. I would definitely recommend them 100%
-
![]()
Mikail Y.
★★★★★
Jacob was amazing, he did a great job on all my cabinets, would recommend 100%. Saved me $8000 on my kitchen and bathroom cabinets
-
![]()
Hiva H.
★★★★★
Very professional and polite. Jacob and his team were easy to work with and did a fantastic job on our kitchen cabinets. We had some existing damage on a few doors and frames and they were able to fix everything with no issue, our kitchen look brand new.
-
![]()
Sonia C.
★★★★★
Pure cabinet painting is an amazing company. Does amazing work very satisfied. thank you so much great work!
-
![]()
Tiana M.
★★★★★
Our kitchen honestly looks brand new again. Chelsea was awesome, super friendly, and kept everything clean while she worked. Our cabinets turned out way better than we expected. Couldn’t be happier with the results!